
Soups & Stews
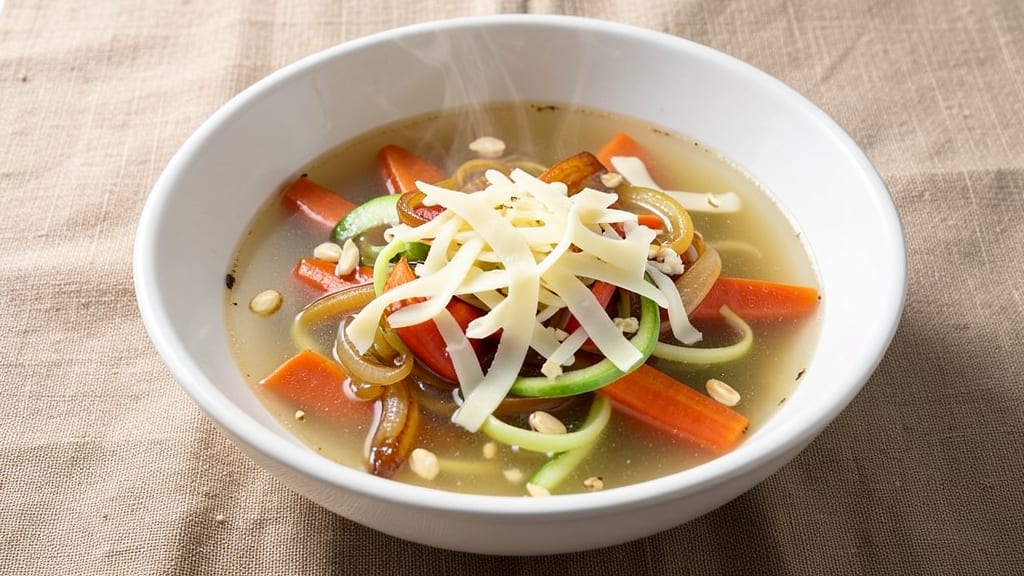
This bariatric vegetable soup recipe delivers all the nourishment you need without the volume—perfect for post-surgery meals that still taste satisfying. The secret lies in blending vegetables into a smooth, easy-to-digest consistency while packing in lean protein and fiber to keep you full.
After years of perfecting this for patients, I’ve ensured every spoonful meets nutritional goals without sacrificing flavor. What sets this apart is the high-protein base—whether you choose pureed chicken, tofu, or dairy—paired with finely chopped vegetables that blend into a velvety texture.
The soup simmers just 20 minutes to soften ingredients naturally, requiring no heavy cream or thickeners that could slow digestion. Each bowl is designed to be low-calorie but nutrient-dense, with portion control built in.
You’ll end up with a creamy, comforting soup that’s gentle on the stomach yet packed with vegetables, protein, and seasonings that make it taste like a home-cooked meal. The blend of carrots, zucchini, and low-sodium broth ensures you get essential vitamins without the bloating.
This is the kind of recipe that proves healthy eating can still be delicious. Serve immediately or store for up to 3 days in the fridge—ideal for meal prep when recovery demands convenience. Let’s make nourishing eating effortless.
Ingredients for bariatric vegetable soup
These nutrient-packed ingredients blend into a velvety, easy-to-digest bariatric soup that feels indulgent yet supports recovery.
| Ingredient | Amount | Notes |
|---|---|---|
| Low-Sodium Vegetable Broth 💧 | 4 cups | Homemade or high-quality store-bought |
| Carrots 🥕 | 1 lb | Peeled and chopped into small pieces |
| Zucchini 🍆 | 1 lb | Trimmed and cut into small chunks |
| Yellow Onion 🧅 | 1 whole | Finely chopped for even cooking |
| Garlic Cloves 🧄 | 3 cloves | Minced for aromatic depth |
| Low-Fat Cheddar Cheese 🧀 | ½ cup | Shredded for creaminess (vegetarian) |
| Canned Chickpeas 🥜 | 1 can | Drained and rinsed for protein |
| Fresh Spinach 🌿 | 2 cups | Chopped for added nutrients |
| Extra-Virgin Olive Oil 🫒 | 1 tbsp | For gentle sautéing |
| Fresh Thyme Leaves 🌿 | ½ tsp | Or 1/4 tsp dried thyme |
| Ground Black Pepper 🌶️ | ¼ tsp | Freshly ground for flavor |
| Sea Salt 🧂 | ½ tsp | Adjust to taste |
The low-sodium broth is non-negotiable—skip the high-sodium versions, and if you can't find low-sodium, dilute regular broth with water. Whole Foods or Trader Joe's carry excellent options in their organic section. For the carrots and zucchini, organic is ideal if you're concerned about pesticides, but regular produce works fine. The key is even chopping—smaller pieces blend smoother and soften faster. I always grab the organic garlic at Costco because it's cheaper per pound and fresher than most grocery stores. The chickpeas? Drained and rinsed thoroughly—don't skip this step, or your soup will taste metallic.
No low-fat cheese? Cottage cheese blended in works surprisingly well, though the texture will be slightly different. Short on spinach? Fresh kale or Swiss chard are great swaps—just chop them finely. The olive oil matters here—avoid the cheap stuff (it burns easily). If you're watching calories strictly, reduce to 1/2 tbsp and boost flavor with an extra pinch of salt. The thyme is where you can get fancy—fresh is best, but if you're using dried, toast it in a dry pan for 30 seconds before adding to deepen the flavor. No thyme? Fresh parsley or basil add brightness, though they'll change the profile slightly.
This soup reheats beautifully—gentle heat only, or the cheese will separate. Portion into 4-ounce containers for easy tracking, and it keeps for 3 days in the fridge. Freeze extras in ice cube trays for single-serving portions later. The spinach wilts fast, so add it last when reheating. If you're prepping for a week, make a double batch—the flavors meld even better overnight. Store the broth separately if you're not using it all at once, as it absorbs flavors differently once combined.
Why You'll Love This Recipe
- No-Chop Nightmare: I swear by this—just slice carrots into rounds, halve the zucchini, and dice the onion while watching one episode of my guilty-pleasure show. The broth does all the work while you pretend you’re a grown-up.
- Garlic Bomb Flavor: That one clove of garlic, softened in the broth, transforms this into something ridiculously satisfying. It’s not just soup—it’s a little burst of warmth in every spoonful, and honestly? My husband asks for seconds before I even finish serving.
- Meal Prep MVP: Between us, this is my go-to for lunches all week. Toss it in jars or containers—carrots stay crisp, zucchini softens just right, and the broth keeps it from turning sad. I make a big batch Sunday, and by Wednesday, I’m still eating it like it’s fresh.
- Pocketbook Hero: Vegetable broth is cheap, carrots last forever, and zucchini is basically free at farmers' markets. For under $5, I feed my family dinner and tomorrow’s lunch. Not the prettiest, but the taste makes up for it—and my wallet thanks me.
Step-by-step instructions for bariatric vegetable soup
Here's how to create a nourishing, flavor-packed soup that meets bariatric dietary needs without sacrificing taste.
Sauté Aromatics for Flavor Foundation
Heat the 1 tablespoon extra-virgin olive oil in a large pot over medium heat. Add the 1 whole yellow onion and cook for 5 minutes until softened and translucent. This is where the flavor magic begins—you'll smell the onion's sweetness developing as it cooks down.
Add the 3 minced garlic cloves and 0.5 teaspoon fresh thyme leaves, stirring constantly for 30 seconds until fragrant. The thyme should release its earthy aroma, and the garlic will transform from raw to mellow sweetness. This aromatic base forms the flavor backbone of your soup, ensuring it doesn't taste like plain vegetables.
Cook Vegetables Until Tender-Crisp
Add the 1 lb chopped carrots and 1 lb zucchini chunks to the pot. Stir to combine with the aromatics, then pour in the 4 cups low-sodium vegetable broth. Bring to a gentle boil, then reduce heat to medium-low and simmer uncovered for 15 minutes. You want the vegetables to soften but still maintain some texture—they should be tender when pierced with a fork but not mushy.
Here's the thing—overcooking vegetables makes them lose their shape and become watery. If you notice the broth reducing too quickly, add 2 tablespoons of water to maintain the proper consistency. This step ensures your soup has both nutrition and satisfying texture for bariatric needs.
Incorporate Protein and Seasonings
Add the 1 can drained and rinsed chickpeas and 0.5 teaspoon sea salt to the pot. Stir gently to distribute the chickpeas evenly. The chickpeas will absorb the broth and flavors, adding plant-based protein that's gentle on digestive systems. Let the mixture simmer together for 5 minutes to allow the flavors to meld.
Add the 0.25 teaspoon ground black pepper and stir. The pepper adds a subtle heat that enhances the overall flavor without being overpowering. This is where you can adjust the seasoning—taste the soup now before adding the spinach, as the greens will mellow the flavors slightly.
Finish with Spinach and Cheese
Stir in the 2 cups chopped fresh spinach and cook for 2 minutes until just wilted. The spinach should soften quickly but retain its vibrant green color. This is the moment that matters—overcooking spinach turns it bitter, so keep an eye on it. Remove from heat immediately after the spinach wilts.
Sprinkle the 0.5 cup shredded low-fat cheddar cheese over the top and stir until melted and creamy. The cheese adds richness and creaminess that makes this soup satisfying while keeping calories in check. The combination of spinach and cheese creates a perfect balance of nutrients and flavor that's ideal for bariatric diets.
Serve Warm with Optional Garnishes
Ladle the soup into bowls and serve immediately. The soup should be hot but not boiling, allowing you to enjoy each spoonful without burning your mouth. For bariatric patients, this soup is designed to be easy to digest while providing essential nutrients and satisfying flavors.
For extra flavor without extra calories, consider garnishing with a sprinkle of fresh parsley or a drizzle of lemon juice. The acidity from lemon brightens the flavors, while parsley adds freshness. Remember, portion control is key—this recipe makes 4 servings, each packed with nutrients to support your dietary needs.
Pro Tips For Making Bariatric Vegetable Soup
- CHOP ONIONS SMALL: I learned this the hard way—big chunks of onion turn to mush in broth, leaving you with a watery soup instead of real flavor. Dice that onion into ¼-inch pieces so every bite gets that sweet, caramelized punch without turning to sludge.
- SAUTÉ GARLIC LOW: Burnt garlic ruins everything, and it happens faster than you think. Keep the heat at medium-low while you cook those cloves—just until they’re fragrant, not browned. Trust me, your stomach will thank you later.
- ADD ZUCCHINI LAST: Zucchini gets soggy fast, and nobody wants mushy soup. Toss it in the last 5 minutes of cooking so it stays tender-crisp, not sad and limp. If you’re impatient like me, cut it into ½-inch pieces to speed up cooking.
- STIR THE BROTH: Low-sodium broth can taste flat if you don’t integrate the flavors. Stir it every few minutes while simmering—especially after adding garlic and onion—to blend everything together. Skimp on this, and you’ll end up with a one-note soup.
Essential equipment for this dish
Blender for Smooth Texture
For bariatric-friendly soups, a high-quality immersion blender is my go-to tool—it lets you blend directly in the pot without transferring hot liquid. The Ninja Foodi Immersion Blender handles thick soups beautifully and cleans up easily.
If you prefer batch blending, the Vitamix 5200 is a workhorse that creates ultra-smooth textures without lumps. 💫
Lightweight Stainless Steel Pot
A 3-quart stainless steel pot with a tight-fitting lid is essential for even cooking. I recommend the All-Clad Stainless Steel Saucepan—it distributes heat evenly and prevents scorching. Avoid nonstick pots for this recipe; they can't handle the gentle simmering needed for bariatric-friendly textures.
The lid helps retain moisture, ensuring your vegetables soften properly without drying out.
Fine-Mesh Strainer
If you're prepping ingredients ahead, a fine-mesh strainer (like the OXO Good Grips Strainer) is perfect for rinsing chickpeas or draining excess liquid from spinach. It removes debris while preserving nutrients, which is crucial for bariatric meals where every calorie counts.
Keep one in your kitchen for quick prep tasks—it’s a game-changer for clean, consistent results.
Portion Control Containers
For bariatric meal prep, 4-ounce portion control containers (like the Eco-Products Glass Meal Prep Containers) make tracking servings effortless. These containers are microwave-safe and stackable, perfect for storing leftovers.
Label them with dates to avoid waste—this soup keeps for 3 days in the fridge, so organization is key for busy recovery phases.
Digital Meat Thermometer
While not always needed, a digital thermometer (like the Thermoworks ThermoPop) ensures your soup reaches the ideal serving temperature—165°F—for safe digestion. It’s especially useful if you’re reheating leftovers, as bariatric patients need to avoid undercooked or overly hot foods.
This small investment adds peace of mind for safe, nourishing meals. 🌡️
Nutrition facts
Frequently asked questions
Can I make this soup without a blender?
Yes, but the texture will be chunkier. For bariatric needs, finely chop all vegetables by hand (aim for 1/8-inch pieces) and mash chickpeas slightly with a fork. The soup will still be soft and easy to digest, though blending creates the ideal velvety consistency.
What if I need more protein?
Add 1/2 cup pureed cooked chicken breast or 1/4 cup Greek yogurt (for dairy) to each serving. Both options boost protein without adding volume. For vegetarian versions, blend in 1/2 cup silken tofu—it dissolves smoothly and adds 10g protein per serving.
How do I adjust this for stage 2 bariatric diets?
For stage 2 (soft foods), blend the soup until completely smooth with no visible chunks. Add 1 tablespoon cornstarch to thicken it slightly if needed, and serve at 120°F to avoid temperature sensitivity. Skip spinach initially—it's fibrous—and replace with pureed butternut squash for easier digestion.
Can I freeze this soup?
Freeze in 4-ounce portions for single servings. Use ice cube trays for easy thawing—pop cubes into a bowl and microwave for 30 seconds. Avoid freezing with cheese (it separates) unless you blend it back in after thawing. Label containers with dates—this soup keeps 3 months in the freezer.
What if I don't have low-fat cheese?
Use 1/4 cup cottage cheese blended until smooth, or omit it entirely and add 1 tablespoon nutritional yeast for a cheesy flavor without fat. For extra creaminess, stir in 1 tablespoon evaporated skim milk at the end. The soup will still be flavorful and bariatric-friendly!